Food Photography Lighting with Ego Artificial Lights!
35 Comments
Posted: 08/29/14
This post may contain affiliate links. Please read our disclosure policy.

Food Photography Lighting with Artificial Lights! Everything you want to know about using Ego Lights for food photography!

Oh here we go. You know you are all on the edge of your seats! As a fellow food blogger it’s one of the main questions I hear flying around the blogging world.
“How do I get a good shot with artificial lighting?”
Today I am joined by fellow food blogger and photographer Danielle from The Creative Bite to show you what we learned while trying to embrace Ego lights. A little history for you, I’ve been blogging a while now and Danielle is fairly new, but she leads with the photography experience as she is a professional photographer and I am not. Therefore after I start complaining about artificial lighting and food photography she agreed to help me try some new set ups and find the perfect marriage. We hope this post helps you out as the winter months are looming ahead! My focus lately is making the blog work for me and not me work for the blog so to make this happen I’m doing my best to embrace artificial lighting!
When I shoot in natural light I really like to use back lighting a lot of the time for brown or monotone foods, which I end up shooting a lot it seems! It helps highlight the texture of the food as opposed to front lighting that will make the food appear flat and bland. I also use side lighting depending on the shot and where I want the light to fall.
If you are trying to achieve a more dramatic appearance in your photos I would recommend using back lighting. If your goal is more of a light and airy image, directional light from either the left or right will help you achieve that feeling. Always remember, every food and set-up will need a little tweaking and love. The same thing won’t always work for everything. Take your time, if you have it, and play around with the power and direction of the lighting to find the most flattering light for that particular subject.
One thing I really had trouble with at first with the Ego light and what frustrated me the most was that it was hard to control the power of the lighting. This is where Danielle came into play. She pointed out some simple solutions like the obvious one of putting white fabric over the light or wax paper. We found out that a simple white t-shirt I stole out of my husband’s dresser drawer worked the best for us. The wax paper wasn’t thick enough for the powerful lights. Using the t-shirt to diffuse the light prevented the subject matter from being to blown out in the photographs.
Scratching your head wondering what “blown out” is? Let me help since I too was confused once upon a time, which really wasn’t so long ago! Blown out means the bright parts of the image will be all white and loose any detail in the picture. If you diffuse the light to much, the shadows will be too dark, so you really need to play around with different set ups. Once again, remember different food might require different techniques. Trust me, I wish there was an easy button with this! Reflectors are also important, whether you are shooting in natural or artificial light. A reflector will help bounce some light back on the image to soften the shadows.
When lighting an image, it is important for the light to clearly be directional. When you are looking at a picture you should be able to quickly tell where the main source of light is coming from. If you have the same power of light on opposite sides of the image, it will appear flat, with little or no shadows, which will make the food look as though it has no texture. Overhead lighting will present the same problem.
Beautiful lighting can usually be achieved with natural light with little effort. Simply place a reflector on the opposite side of the window where your natural light is coming from and you are good to go. When it comes to the dark winter months, when we loose most daylight by 5pm, there needs to be an alternate plan. That is where artificial lights, such as the Ego lights I use, come in handy. They can be intimidating for those who have only worked with natural lights, so with the darker months right around the corner, I thought I would show you how I light my images with artificial lighting.
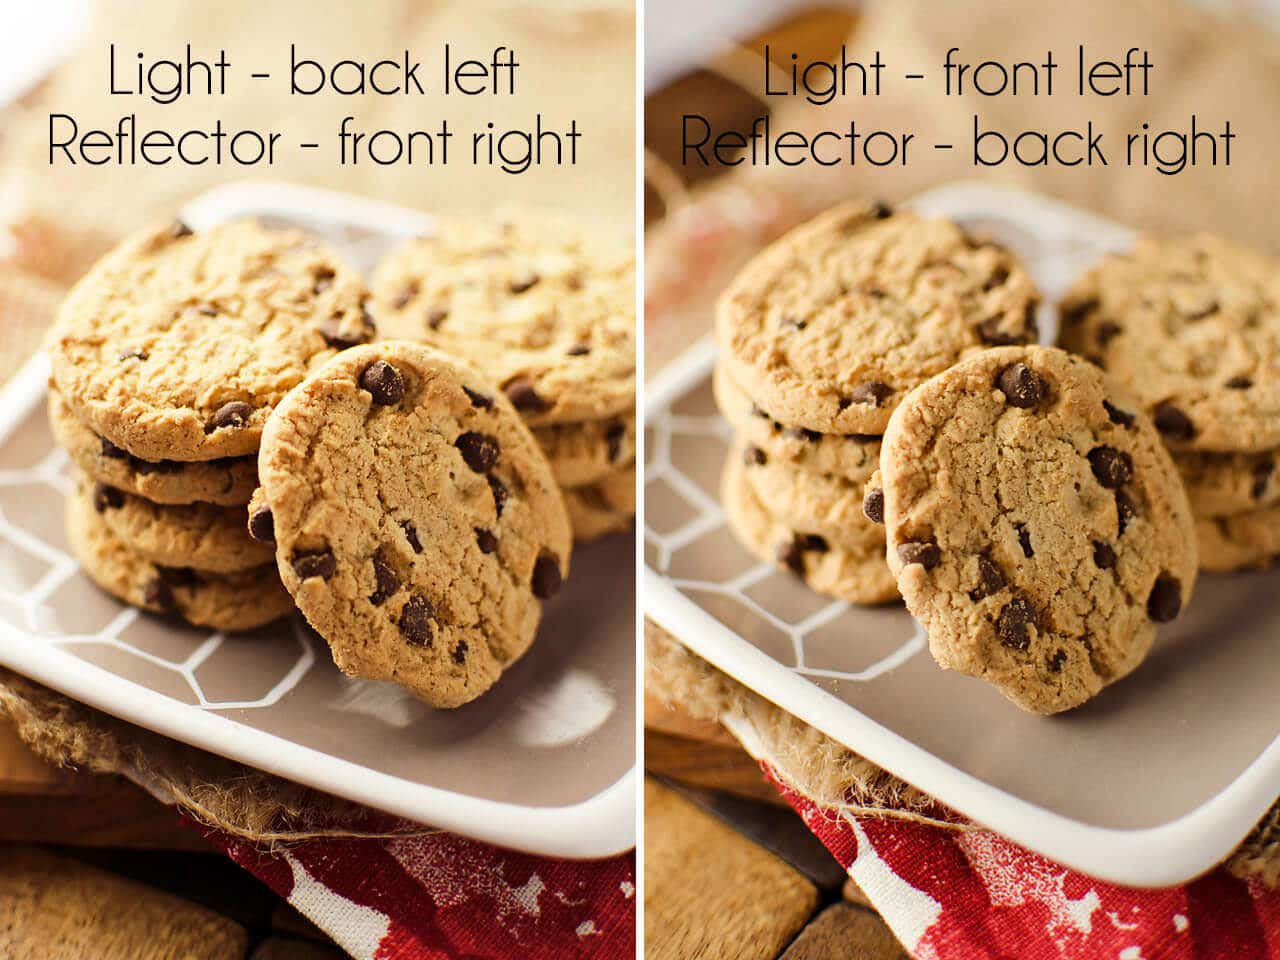
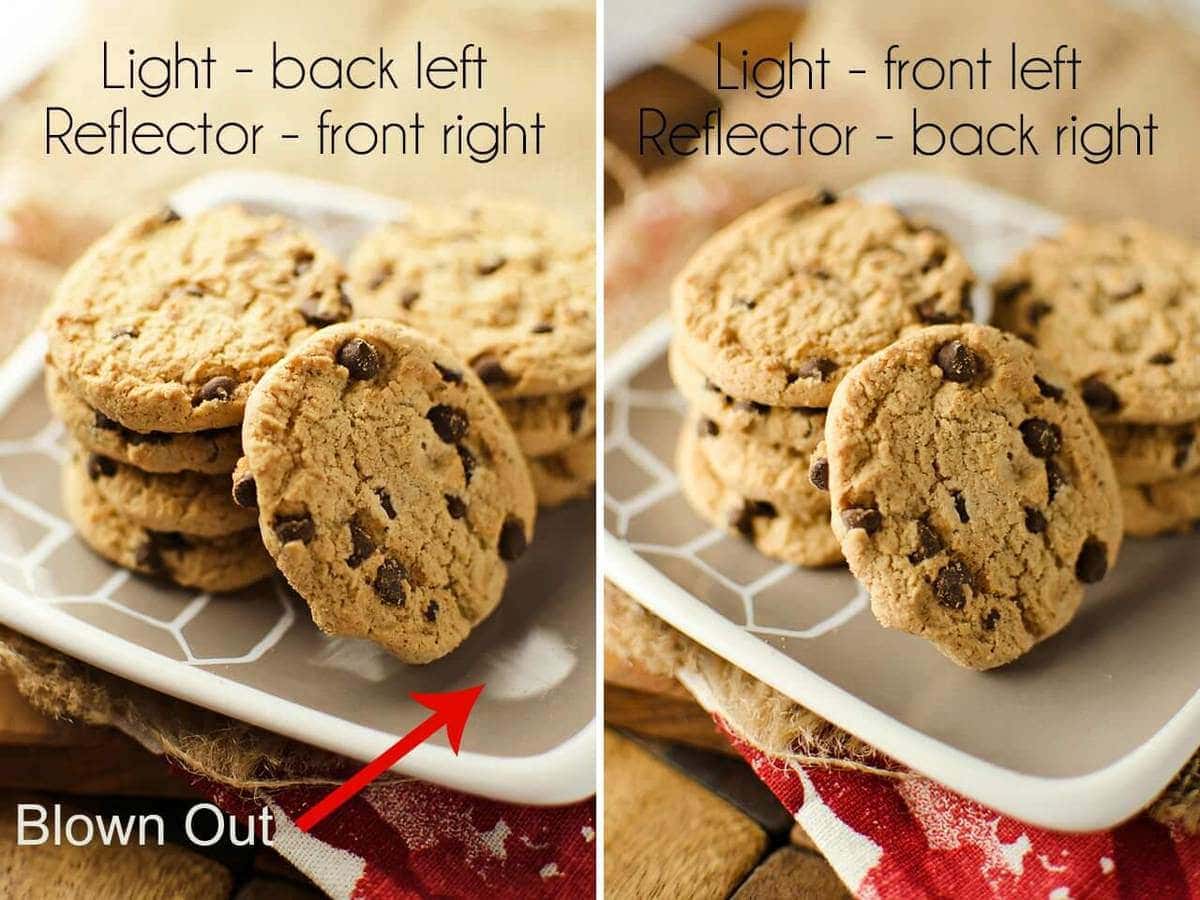
Below you can find some examples of different possible lighting set-ups and how they highlight the subject matter.
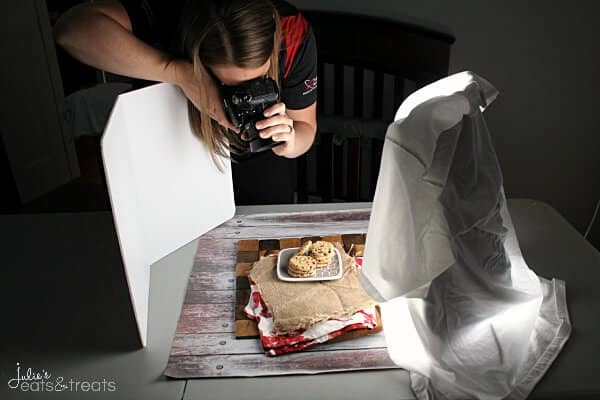
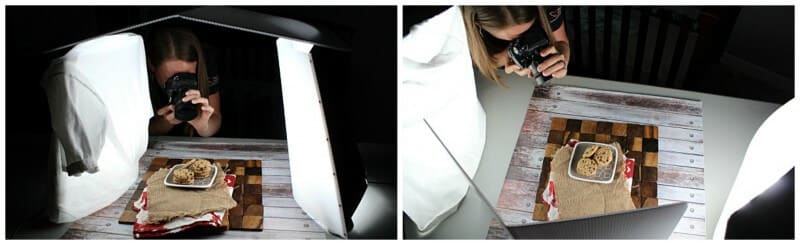
As you can see there is nothing fancy about my set up I’m using. I’m literally in our empty nursery (notice the crib in the background?) with a folding table and my lights and props. You do not need to be fancy people! The two pictures in the collage demonstrate two different looks you can achieve with the Ego Lights. One represents the Ego Light in the back left corner and the reflector in the front right, which I’m demonstrating in the photo below it. The other just moves the Ego Light to the front left and the reflector in the back right. Pretty similar shots but when I look at them side by side I lean towards the second one with the light in the left front and reflector in the back left. I feel that the picture has less area of trouble like being blown out.

The two shots we are comparing here look pretty similar. The one on the left with the overhead reflector has a few less shadows in it so you lose out on some of the texture in the picture. When shooting a monotone subject this can be difficult. The shadows make the picture come alive and show the texture. A lot of people fear the shadow but in all actuality you want some shadows to show the texture of the photo subject. This will also create a moody effect if that’s the effect you desire.
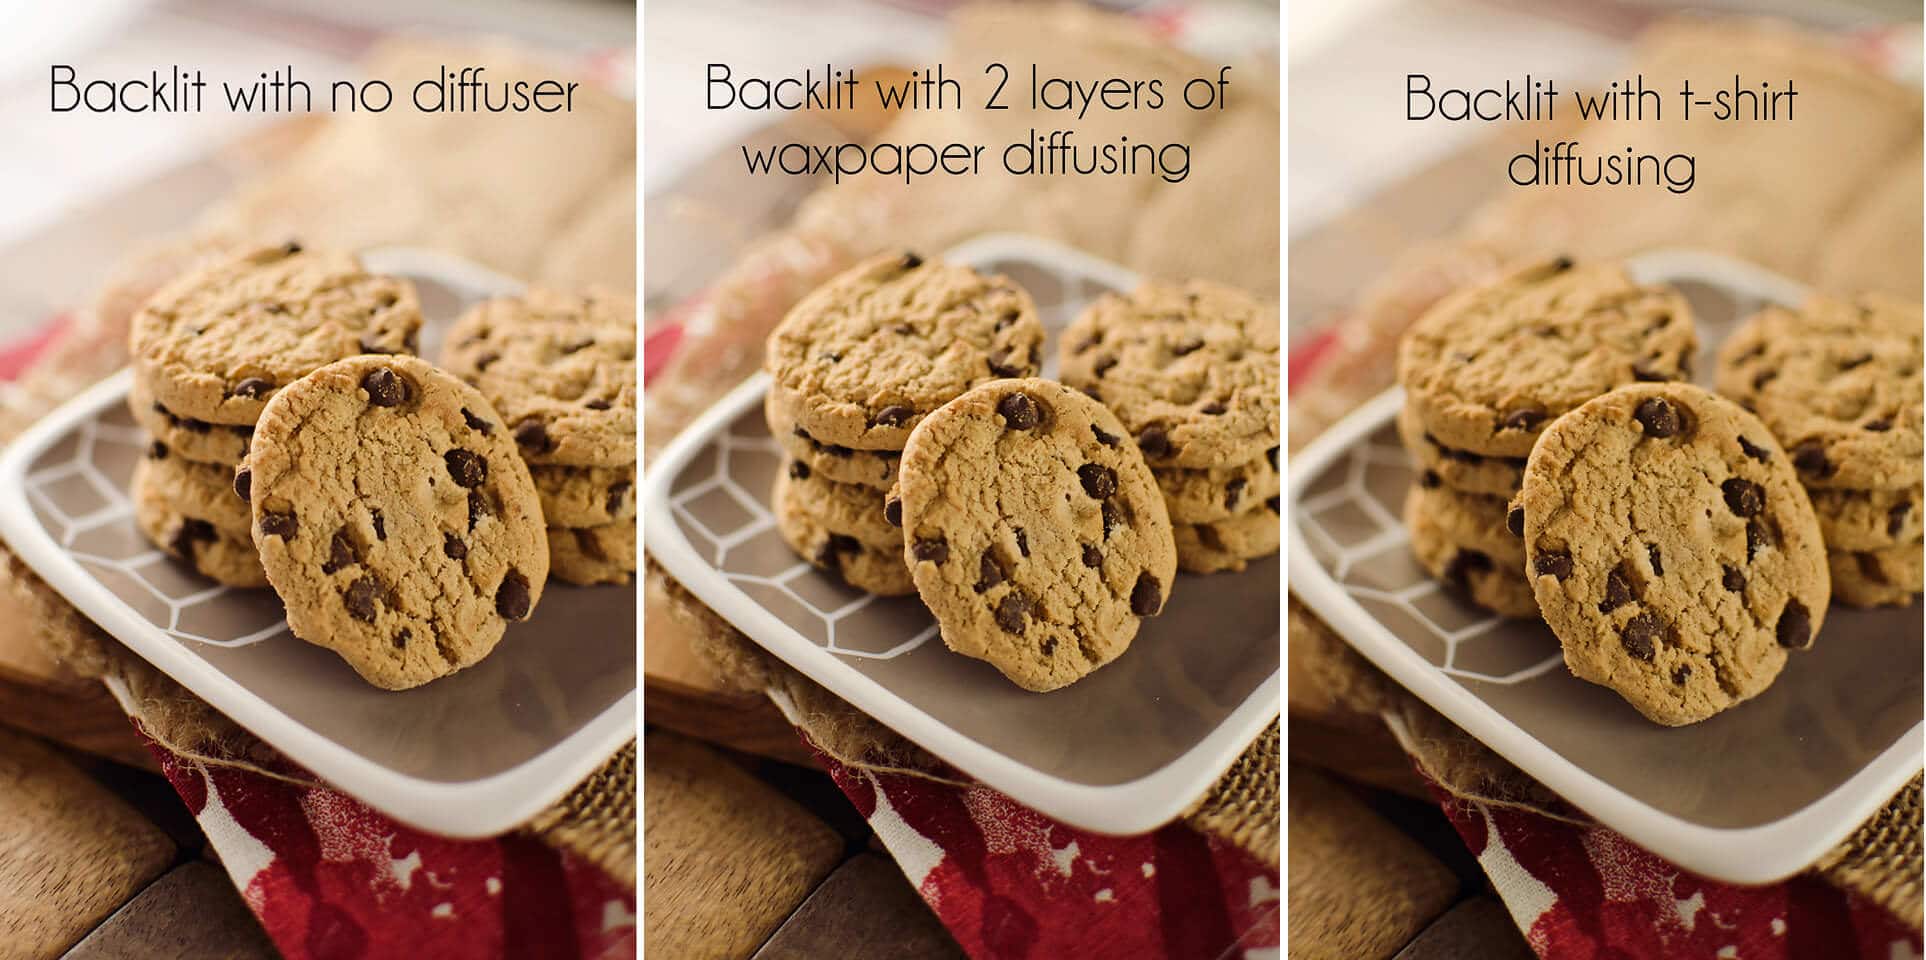
These three pictures are simply comparing how to diffuse your Ego light. The lights are set up completely the same, but the diffusion is different. The first backlit with no diffuser, the second photo is backlit with two layers of wax paper and the third photo has the white t-shirt diffusing the photo. I, personally, lean towards the last photo in the collage with the t-shirt diffusing the light. It provides some nice shadows and textures and really makes the cookie come alive. Also, as I have shot a few different dishes with the set up I find that this works the best overall no matter what the subject matter is.
Is your brain spinning yet? This is just the beginners guide to shooting with Ego lights and really it just takes a lot of time and practice, but it’s worth it because it gives you the freedom to photograph your food whenever you want! I always thought everyone could tell exactly what photos I used artificial lighting in so to see if this was true I posted three pictures in a Facebook blogging group and asked the other bloggers (who are amazing, talented photographers) to pick out the dish with artificial lighting. About 75% of them picked out the wrong picture. This is when I started to believe that I could use Ego lights and be successful with it. Obviously, I know which picture is shot with artificial light but others don’t.
If you are looking for a little more freedom when you take pictures go by a couple of Ego lights and embrace them!
Thank you so much to Danielle at The Creative Bite for assisting me in this experiment!
If you need to purchase the Ego lights you can find them on Amazon for $124.95 currently with free shipping. I highly recommend getting two of them for the best effect!
*I am NOT a professional photographer and this simply some valuable things I have picked up through trial and error that I wanted to share!
*This post may contain affiliate links


Solve says
This is the best blog! This article is very comfortable. It is an amazing post you have published here. I have seen your post carefully and liked it. Hope that you will share such an effective post regularly, thanks.
Julie says
I’m glad you enjoyed it!
Sofiq says
Vary grateful post. Thanks for shearing.
Clipping Path Service says
Wonderful tips about food photography.Nicely explained.thanks a lot.
Photoshop Clipping Path Service says
Hello, its fastidious post concerning post and good quality images, Thanks for sharing nice information
Teen Tee says
WooW…Very effective tips. Thank you so much. keep it up….
Vik says
This is awesome, thanks for the info. Never tried the t-shirt thing, will definitely use that tip! Curious, have you ever used your EGO light *along with* natural lighting? Like to supplement the natural light, or to lighten shadows?
Julie Evink says
I have not but I know that other food bloggers do it and have great success using it to fill light!
Rahul amin says
First of all appreciate your photography and then thanks for sharing it.
Some great moments are captured that provides more happiness to people mind.
Sumi @ background remover says
It is extremely helpful for me. Thank you for taking the time to discuss this.